
Signals help us look up within multiple attack vectors, signals are triggered via Workbooks i.e. as per the logic set in its query. On executing a query via workbook and if there are any threat related data such as types of attacks etc, a signal will be triggered alerting us with relevant intel.
For example, if there is a “Brute Force” attack on a client’s website’s login screen, then we can effectively pull out relevant information regarding this attack, such as “Source IP Address”, “Event Name”, “Type of Attack”,”Source Country” and other relevant details as needed.
How to add a signal block?
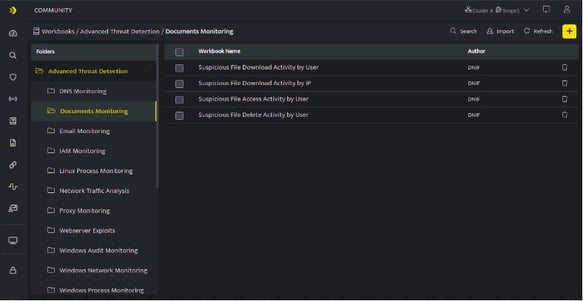
- Hover on the Workbooks icon on the left navigation bar, it will display the folder wise view of existing workbooks in the tenant (previously known as cluster).
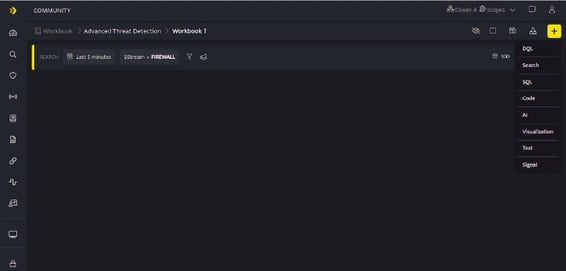
- Click plus icon on the Workbook page and then add a DQL /Search / Code / AI Block before you add a Signal Block.
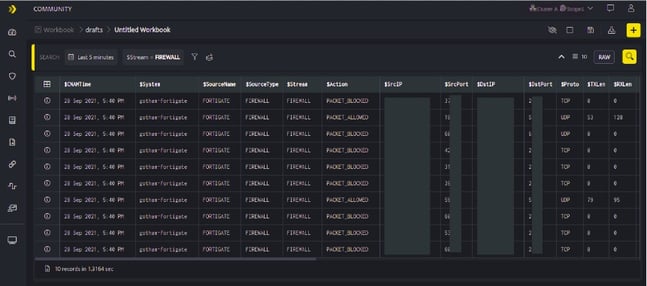
- Once the query results of DQL /Search / Code / AI Block are displayed as in the below screen, you can add a signal block based on this particular query result.
- Click the plus icon on the Workbook page and select Signal Block from the list, the following section will be added to the Workbook page.

On the above screen, you will have to enter the following fields:
| Field | Description |
|---|---|
| Name |
Enter a signal name for the signal you are about to create. Signal name has been parameterized, users can enter multiple field values with _ (underscore) and this will be displayed as a detection name on raising a signal. Note
|
| Tactic | The system will recommend options for tactics based on the query results and attack type. |
| Technique | The system will recommend options as per the tactic selected. |
| Confidence | Based on the attack level and impact you can decide a confidence level such as High, Medium, Low, of the signal. |
| Score | Enter a score level for the attack in the range of 1-10, where 10 being the most critical attack and 1 a low risk attack. |
| Target | Target is the system/ IP/ file that was targeted for the attack. The common types of targets are listed as under:
|
| Suspect | Suspect is the system/IP/URL etc from where the attack was initiated. The common types of suspects are listed as under:
|
It is mandatory for a signal to have a target or a suspect. You can add multiple target fields and suspect fields.
- Enter / select the details and click Run, to raise the signal. The following message will be displayed:
Signal raised successfully
How to view the raised signal?
- Execute the following query to check if the signal has been raised
_fetch * from event where $Stream=SIGNALS limit 10
Signal Block Functions
| Icons | Functionality |
|---|---|
| Used to execute the query | |
| Click this to revoke the executed query. | |
| Used to filter the query result based on your requirement. | |
| Delete a block |
For more details on details on Workbooks, refer Create a Workbook
Parameterised Signals
Enter a signal name for the signal you are about to create. Signal name has been parameterized, users can enter multiple field values with _ (underscore) and this will be displayed as a detection name on raising a signal.
- Parameterized signal names eliminate the need to create multiple workbooks for each detection type.
- Every parameterized field should be prepended and appended with an underscoreSignalname_$Fieldname1_ _$Fieldname2_ _$Fieldname3_
- Example: signal_$Evtlen_ _$Pstatus_
- Sample output of the above example will be displayed as signal_1423_NEF